
 Chronicles
This page gives a short introduction to WiFi and provides information to get consistent high speed wireless access throughout your house or small business. It is specifically targeted to larger homes and for those that have very high speed Internet access (500 Mbps or 1 Gbps).
Information last updated October 16, 2024.
WiFi is a short range (less than a few hundred feet outdoors, less than 80 feet indoors typically), high speed (gigabit) wireless standard used for local networks. It is used by all smartphones, laptops, tablets, etc.
Unless you have a very small house (less than 1,500 square feet), you will need several WiFi Access Points spread through your location to give you seamless uninterrupted coverage. These Access Points (APs) are connected back to your Internet router or gateway either via an Ethernet wire, or wirelessly. Many Internet Service Providers (ISPs) supply routers that also have a WiFi access point built in, but unless you have a small location, you'll need other APs.
The latest Wifi standards, WiFi 6E and WiFi 7, can reliably transfer data at gigabit speeds if the access point is in the same room, and at respectible high speeds through walls.
When setting up a WiFi network, it is important to understand frequency bands and channels. WiFi operates at now three different frequency bands, with many channels in each band. The 2.4 Ghz frequency band supports 3 non-overlapping channels, and has a typical maximum transfer rate of 144 Mbps, while the 5 Ghz band supports 24 non-overlapping channels and maximum transfer rates close to 1 Gbps (1000 Mbps). The very latest APs that are WiFi 6E or WiFi 7 compatible, operate in the 6 Ghz band supporting even more channels. Older or simpler devices can only use the 2.4 GHz band. While the 2.4 GHz band has almost twice the distance reach of the 5/6 GHz bands, the 5/6 GHz bands are what you need to get very high speed connections.
So, you need to design a network that provides good coverage for the shorter range 5/6 GHz band, while also having a 2.4 GHz band network for older devices and areas that are farther away like outdoor backyards. Client devices like laptops and phones will automatically choose the frequency band and AP they connect to using their own algorithms.
Ubiquiti is my recommended brand for WiFi. While their products are business grade and can be found in offices, hotels, and stadiums, they are also very affordable and easily purchased directly from Amazon or from Ubiquiti directly.
A complete list of Ubiquiti APs is here.
All Ubiquiti APs are powered via Power Over Ethernet (POE), meaning that a single Ethernet wire can transport both data and power to the device.
Set up is relatively easy and initially handled via a phone app. The app uses bluetooth to initially communicate with the devices until the WiFi network is set up.
In the next sections, I'll talk about what to buy, and then set up tips.
The core element is a router/gateway/firewall/management device which Ubiquiti calls a Unifi Cloud Gateway. It secures your home network from the Internet via a security firewall function, and also acts as the central management computer to configure all your WiFi APs, so they can be easily configured as a single WiFi network.
There are a lot of choices here, but my recommendation is to buy the Cloud Gateway Ultra for 1 Gbps and lower Internet connections (10 Gbps connections put you into a huge step up in cost and complexity which I won't go into here). Unlike other Ubiquiti gateways, this one doesn't have a built in Access Point (but WiFi versions keep upgrading, so I don't like to tie my gateway to a particular WiFi version), nor capability to host security camera recordings (but I recommend one of Ubiquiti's dedicated camera servers for that, like this one.).
Next to buy are Access Points which deliver WiFi radio signals into your house. The latest WiFi version is now WiFi 7, which is a big step up in speed over WiFi 6. There are three Ubiquiti WiFi 7 APs, buy a mix of them depending on your wiring and requirements.
If you have ceiling/attic wiring (or can run wires there), the U7 Pro is the AP to get. It mounts on the ceiling using included hardware.
If you have wires going to a wall receptacle, you want the U7 Pro Wall. It has hardware to attach to a normal low voltage mud ring and goes in place of a wall plate.
If you've run Ethernet wire outdoors for yard access, then the U7 Outdoor is the one to get. This AP can be used in three different ways. Its defaults to not using the included antennas and is a directional unit that radiates forward through the front. You can instead screw in the included omnidirectional antennas, and configure it in the console to use those antennas and now it bradcasts over a 360 degree area. Finally, you can buy antenna cable with RP-SMA connectors to use remote antennas from the one unit.
Ubiquiti was a wide range of other APs for specialized applications.
The final piece to the puzzle are POE (Power Over Ethernet) switches. These are devices that connect your gateway to all the Access Points while also delivering them power. Here the buying advice gets more complicated because you have to map out where all your wires go to and how many APs each switch will have.
For instance, if you have a main house and a guest house, you may want one switch in the main house by your gateway, while another switch in your guest house to handle all the APs (and other devices) there.
You also have to compute how much power your APs will need to size your POE switch. Max power consumption on the above three APs I recommended range from 19W to 22W. Just assume 20W per AP and you'll be fine. But that means a three AP setup won't work on a 45W maximum power POE switch. Ubiquiti keeps introducing new POE switches to fill out their product line, but here's a list of the ones a home user would likely buy:
| Switch | Total Ports | POE Ports | Total Power |
|---|---|---|---|
| Lite 8 PoE | 8 | 4 | 52W |
| Lite 16 PoE | 16 | 8 | 45W |
| Standard 16 PoE | 16 | 8 | 42W |
| Standard 24 PoE | 24 | 16 | 95W |
| Pro Max 16 PoE | 16 | 16 | 180W |
| Pro Max 24 PoE | 24 | 24 | 400W |
That's it for the buying guide. I've found it usually better to buy from Ubiquiti directly - they ship the next day after an order is put in and it's a one day ground delivery for CA residents. Keep checking if an item is out of stock, they usually get back in stock within a day or two. They have an easy return policy.
You download the UniFi app to initially configure your network. You can continue to use the app for all network configuration, or you can use your PC to go to http://192.168.1.1 after your gateway has been setup to continue work via a PC. The app uses bluetooth to initially communicate with the devices until you've set up a WiFi network.
After setting up your gateway, you set up a few WiFi networks. You give a name and some unique capabilities to each WiFi network.
The first network is your main network that your family will use. Give it a name, a relatively easy password that you'll remember (you can always go back into the app and see what the password is), and set it up to use the 2.4 Ghz, 5 Ghz and 6 Ghz frequencies.
The second network is a guest network. This network will be restricted to accessing the Internet only and can't be used to access any devices inside your network for security reasons. Use a really easy to remember password (I use "friendly") and again use the 2.4 Ghz, 5 Ghz and 6 Ghz frequencies.
Finally, create a special "Internet Of Things" network that your dishwashers, lightbulbs and older WiFi devices can use. Call it "Some Name 2.4" to remind you this is a 2.4 Ghz only network for older devices. Restrict it to the 2.4 Ghz network.
You adopt each access point into your management console as you turn them on.
Ubiquiti devices can be set up completely automatically where the system will assign non overlapping frequency channels for each WiFi Access Point. A more advanced system setup would manually assign frequency channels based on their physical locations. Take a look at the General Design Rules section below to see set up tips on how to do this.
Here's a diagram showing access point placement for an approx. 6,000 sq ft main floor house.
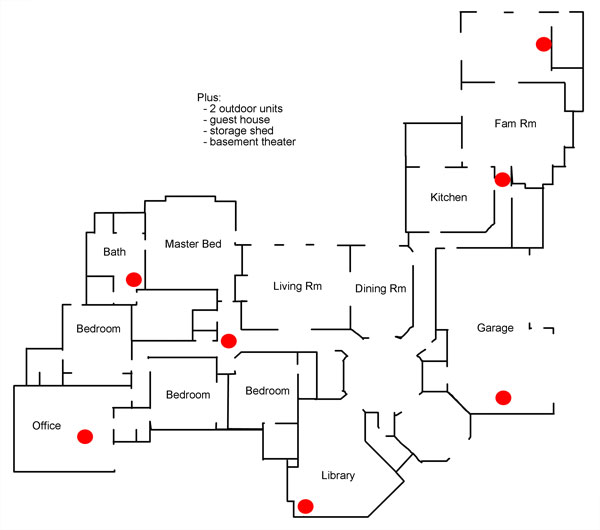
Seven access points, or about one per 1,000 sq ft (including the garage). Since 5/6 GHz WiFi signals in particular do not penetrate through many walls very well, you need a lot of access points if you want to have a robust high speed wireless network. In this example, ceiling mounts were used since the house had an accessible attic to run Ethernet cables to each access point (power for each access point is also delivered via the Ethernet cables, so no wires of any sort are seen in such an installation).
A good rule of thumb is to place an AP in every second room. You generally only want at most one set of walls between you and an AP. Yes, you can get by with less, but your wireless speeds will drop dramatically. With access points in the $150 range, it doesn't make sense to economize.
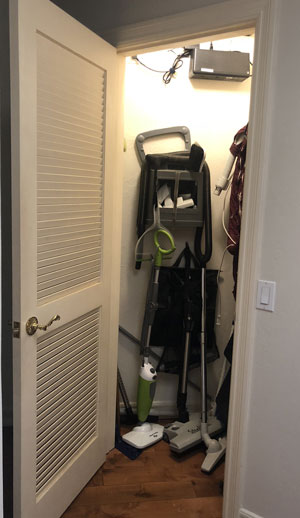
Ideally, you will want to run an Ethernet wire to each AP location, with all such wires brought back to a central location somewhere (usually a centrally located closet). Even a tiny broom closet like this one can house the required electronics for your Internet and wireless system.
I would use Cat 6a cable when running new cable. Cat 6a will be able to run 10 Gbps Ethernet up to 300 feet.
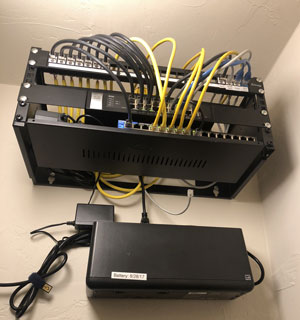
Here, there is room at the top of the closet, out of the way from all the hoses and brooms, to wall mount a small 19" equipment rack (see below). From top to bottom, there is an Ethernet patch panel, the firewall router/switch, and a 16 port POE switch to power the APs (or use a 24 port switch for larger installs). The black box underneath the rack is a small computer UPS, allowing WiFi to work even in a power outage. These POE switches were recommended since they don't have fans (larger units typically have fans) so they are silent. But Ubiquiti has a range of POE switches.
- Use a single network name for the 2.4 GHz, 5 GHz and 6 GHz frequency bands. Also create a 2.4 GHz only network which will be used for various stand alone devices, like dishwashers, refrigerators, cars, etc. Often these devices cannot connect to a mixed 2.4/5/6 GHz network. Assign a password to these networks.
- Create a "Guest" network, which is locked down to only allow access out to the Internet. Use a very easy to remember password since guests will ask for this and you don't want to be hunting for where you wrote the password.
- Manually assign channels for each Access Point. While some APs can automatically choose their own channels, it rarely works well in practice. Draw a floorplan map of your deployment and figure out which APs get assigned what channels, with the idea being that adjacent APs do not have the same channel.
- Use only channels 1, 6, and 11 in the 2.4 GHz frequency. These are the only non-overalapping channels. Microwave ovens interfere with channels 6 and 11, so use channel 1 for the AP closest to the kitchen. Use only 20 MHz wide channels for the 2.4 GHz band.
- Use 80 MHz wide channels for the 5 GHz band, and 160 MHz wide channels for the 6 GHz band
- Use channels 36, 52, 104, 132 and 149 for the 5 GHz band (using 80 Mhz channels). This includes "DFS" channels that can have interference from radar. Try to only use channels 104 and 132 for RF isolated APs, such as one in a basement or deep inside a house.
- Use channels 5, 37, 69, 101, 133, 165 and 197 (using 160 MHz wide channels) for the 6 GHz band.
- Adjust the signal strength of the 2.4 GHz band to be at low or medium strength, except for those APs that need to cover a wide area, like those expected to cover a yard. This will allow devices to preferentially use the less crowded and higher speed 5 or 6 GHz band.
- Use a WiFi sniffer device, like described in the tools section below, to measure signal strength in all important areas of the house. Bathrooms are particularly difficult since they are enclosed and usually away from APs, and people like to read their devices in there.
You need some sort of WiFi sniffer tool to see how good signal strengths are around your house either before or after you install your new WiFi network. The best device to run a sniffer on is your smart phone since it is also the weakest WiFi device you will be using. You want to design your network for the weakest device.
If you have an Apple iPhone, you only have one choice, and that's to use Apple's Airport Utility app, which has a secret built in WiFi analyzer. Click here for a tutorial on how to set this app up to analyze your WiFi environment.
For Android devices, use WiFi Analyzer.
Both analyzers show signal strength in db values. The higher number the better, but since these values are negative numbers, be aware that a -50 db signal strength is higher and better than a -70 db signal strength.
Ideally you want 5 GHz or 6 GHz signal strength to be in the -60's or better. Numbers in the -70's are acceptable, but when signal strength degrades to the -80's, that's marginal. Add an AP if you have signals in the -80's for commonly used areas of the house.